What's new
What's new

To flame cut or not to flame cut, which is the better option in A36 steel

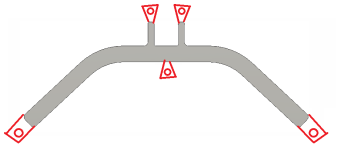
This is what the rough cut blanks will look like:
View attachment 438967

I added +.050 around all the sides before giving it to them to quote so based on their tolerance I'll get anything from +.05 to +.24. The tightest tolerance on it is the width between the 2 tabs which is .005. Everything else is pretty loosey goosey by our standards. Do you think flatness will be an issue after stress relief? I'll see what our heat treater says. Thanks for the suggestion.

My plan is to toe clamp it on one side, finish half the profile, flip the clamps around, finish the other half. There are some blind threaded holes on the sides but I'm not worried about those at all.
After seeing your part it looks like the bending idea submitted would be a good candidate. The tabs could be welded on , full penetration. It’s sounds like you already ordered flame cut. Stress relief is not known to cause warp but rather the opposite. Let us know how it goes. Good luck.
 
Flame cutting A36 doesn't create hard spots, for the most part.

You get a tiny bit of carburization but it's nothing like flame cutting alloy steel, e.g. 4140, where the HAZ is pretty much full hard.
 
IME, some of what warpage happens when you machine flame cut material varies depending on how the part was oriented in the plate. Years ago used have a part that was a flame cut blank from 1.5" A36 plate made in batches of 100+. There were 3 places where 1/8" wide "pinch slots" were cut to intersect 1" diameter bored holes. Used a 5" diameter slitting saw to cut them. Most of the time the sawing went fine but every so often one would pinch the blade right as it cut into the bore. The saw often would break as it sheared the key. Had to be quick on the feed to to stop it when the saw didn't break to save it and the arbor. Finally traced the issue to the supplier of the flame cut blanks. The bulk of a batch was cut in a nested grid with parts nested together 180 degrees apart. Along one edge of the plate a single row of blanks could be cut at 90 degrees to the rest of the blanks. Those were the parts that were pinchers.
 
N
Has that worked for you ? I've had stuff stress relieved and it didn't do shit. Annealing yes, makes a difference but stress relief never did anything but cost money.

Definitely a fan of annealing tho. Especially that shape that looks like it really wants to either squeeze up or spread its wings when you take a cut. I'm guessing spread because the grain will be running the long way and removing material from the middle will let it sproing out. But guessing is just guessing ... maybe it'll be a good boy all on its own and we're just paranoid.

No, now that I've seen it and heard how little stock he's trying to leave, I'd also get it at least stress relieved. That will normalize the stress and keep it from going too haywire. That is WAY too little stock. I'd be at +⅛" on any surface that needs to be cut. And yeah SR works, just not as great as a full anneal. For something that small I don't think a full anneal is necessary. If picky, rough perimeter complete then come back and finish
 
I would expect the part to move once you have the flame cut edge cut off one side since in my experience the flame cutting induces stress to the material. I would rough one side, clamp the on that side. Remove the clamps from the other side and rough it. Then I would remove all the clamps let the part relax, then clamp and finish.
 
.050 TOO LITTLE.

You should be at +.100 at least per side. Maybe .150. And let them add their .200.

You can assume they will be at the high end of their plus tolerance, but be prepared for them to not do that, and have random streaks of flame going into minus territory.


Also: Imagine it does warp a bit, which i don't expect anything extreme. But a .010" "bend" (ie, not flat) in the middle of that shape, after you cut it with an endmill, can cause the overall length to expand or shrink by much more than .050". Give yourself some room. Your machine will not care if it is cutting .050 or .200, the material is easy enough.
 
Flame cutting A36 doesn't create hard spots, for the most part.

You get a tiny bit of carburization but it's nothing like flame cutting alloy steel, e.g. 4140, where the HAZ is pretty much full hard.

I used to cut a lot of flame cut 4130 plate, life got 10x better (and a little more expensive) when I had EMJ saw the plate instead of flame cutting.
 
I haven't ordered the material yet so it sounds like I should add at least .100" per side for them.

It also wouldn't hurt to do multiple roughing passes to help with any stresses that get released.

Does anyone have recommendation for a better way to hold it to be able to get at both sides of the profile at the same time? My other thought was buying some large pitbull clamps to be able to face+rough the top half, then flip it around and repeat before going on to finish it.
 
I had a wire EDM project a long time back. Similar'ish shape, maybe curved arms. First try the finish passes weren't cleaning up. Had to make a rough cut on them outboard by .100 or so for stress relief and then cut the profile.

Another, some small punches with narrow stalks fixing them in a blank. Same problem, finish passes on the support stalk warping them one way and then the other. Reprogram so the finish passes didn't touch the supports.
 
I haven't ordered the material yet so it sounds like I should add at least .100" per side for them.

It also wouldn't hurt to do multiple roughing passes to help with any stresses that get released.

Does anyone have recommendation for a better way to hold it to be able to get at both sides of the profile at the same time? My other thought was buying some large pitbull clamps to be able to face+rough the top half, then flip it around and repeat before going on to finish it.
I'd first try to talk the customer into letting me drill a few holes through it to bolt it to a plate. Since it's not a fussy airplane part or cosmetic it might be doable. Maybe even tack weld a few pads onto it for clamping then mill the pads off afterward. Or leave pad material in the flame cut profile.
 
I'd first try to talk the customer into letting me drill a few holes through it to bolt it to a plate. Since it's not a fussy airplane part or cosmetic it might be doable. Maybe even tack weld a few pads onto it for clamping then mill the pads off afterward. Or leave pad material in the flame cut profile.
Its even worse than airplane parts. It's G-work ;)
 
When you say cut one side, move clamps and cut then the other do you mean cut left half, the right half?, Or cut the top, then flip and cut the bottom?
Based on profile I'd expect more movement cutting it left/right than top/bottom. Can you hold it with edge clamps against a stop and cut the whole profile then flip?

Or get it cut with extra material on the ends/tabs and hold it the whole time, then lop those off at the end?
I did a project starting from WJ cut parts, I had them add tabs for bolt holes around the perimeter. Parts were 3D swoopy all around so by the end the parts were totally floating, except the tabs which I used as my reference surface.
Deck both sides for a good reference, machine the part complete (flipping as necessary) then whittle away at the tabs until the part is free.
 
I haven't ordered the material yet so it sounds like I should add at least .100" per side for them.

It also wouldn't hurt to do multiple roughing passes to help with any stresses that get released.

Does anyone have recommendation for a better way to hold it to be able to get at both sides of the profile at the same time? My other thought was buying some large pitbull clamps to be able to face+rough the top half, then flip it around and repeat before going on to finish it.

Add minimum +⅛" everywhere and skip the SR. Something that small doesn't need it as long as you leave enough stock, in my experience. You either pay for it now (stress relief) or pay for it later (a bit of extra machining time). The latter is safer with a full perimeter rough out and subsequent finish.

Edit: I originally misread the 17" OAL, thought it was 7". In that case, the stress relief may be a good idea.
 
Last edited:
When you say cut one side, move clamps and cut then the other do you mean cut left half, the right half?, Or cut the top, then flip and cut the bottom?
Based on profile I'd expect more movement cutting it left/right than top/bottom. Can you hold it with edge clamps against a stop and cut the whole profile then flip?

Or get it cut with extra material on the ends/tabs and hold it the whole time, then lop those off at the end?
I was thinking top half then bottom half. Split like this between red and blue:

1715198950278.png

There are no holes through the top which could be used for holding. The final part thickness is 2"+/-.02 and the plate is supposed to be 2"+.06/-0. I could get 2.125", toe clamp it, then deck off the extra.

Would holding it just at the ends be sufficient? I'd be worried about the middle flapping about since the ends are 17inches apart.
 
I'd be cutting these out on a Mori DuraVertical 5100 with a 20hp cat40 spindle. I think it would be powerful enough with our 3/4in indexable cutters to get under the skin like you guys are suggesting.

Based on the cost savings of the material, I wouldn't be opposed to investing in a new cutter if there's one you guys think would work really well. Most of our indexable stuff is Ingersoll.

Alro is supplying the material. I'd like to think they know how to properly flame cut but I've got no experience to say. I did ask them to also quote water jet so here's out the pricing works out:

Flame cut (+.19/0): $2800
Saw cut (+.13/0): $5000
Water jet (+/-.06): $9000
JFC... thats an insane markup for waterjet!
 
I was thinking top half then bottom half. Split like this between red and blue:

There are no holes through the top which could be used for holding. The final part thickness is 2"+/-.02 and the plate is supposed to be 2"+.06/-0. I could get 2.125", toe clamp it, then deck off the extra.

Would holding it just at the ends be sufficient? I'd be worried about the middle flapping about since the ends are 17inches apart.
There don't need to be holes in the part or the tabs, that was just how I did it for one project.
The tabs could be solid and just held down with toe clamps. You're getting the thing cut out of plate, you can make the starting shape whatever you want so long as it nests well enough to still save money.
1715201569028.png*** Tabs/holes not to scale***
 

Attachments

  • 1715201202875.png
    1715201202875.png
    12.6 KB · Views: 1


Back
Top